
Permission Request System
The Permission Request system in AZExecute provides a formal approval workflow for managing API permissions, app roles, delegated scopes, and pre-authorized client access. This ensures proper governance and maintains an audit trail of all permission changes.
Why Use Permission Requests?
Permission requests solve several common challenges in application permission management:
Security Governance: API owners review and approve permission requests before granting access
Audit Trail: Complete history of who requested what access and when it was granted or denied
Justification Required: Requesters must explain why they need access, aiding in security decisions
Automated Notifications: Application owners are notified of pending requests via email
Reduced Admin Burden: Distributes permission management to application owners instead of central IT
Request Types
The system supports three types of permission requests, each serving different access scenarios:
Application Permissions (App Roles)
Request application-level permissions that allow your app to act without a signed-in user.
Use When: Your background service needs to access an API automatically
Example: Requesting "User.Read.All" to synchronize user data from Microsoft Graph
Grant Process: After approval, admin must still grant consent in Entra ID
Delegated Permissions (OAuth2 Scopes)
Request delegated permissions that allow your app to act on behalf of signed-in users.
Use When: Your web or mobile app needs to access APIs while users are signed in
Example: Requesting "Mail.Send" to send emails on behalf of the signed-in user
Grant Process: After approval, users or admins grant consent during sign-in
Pre-Authorized Client Access
Request to be added as a pre-authorized (trusted) client for specific API scopes.
Use When: You want to eliminate consent prompts for users accessing your API
Example: Requesting pre-authorization for "access_as_user" scope in a related first-party app
Grant Process: After approval, pre-authorization is configured immediately in Entra ID
Creating a Permission Request
To request permissions for your application:
1. Navigate to your application's details page
2. Go to the Requests tab
3. Click Request Permission button
4. The request creation dialog opens

Request Creation Steps
Step 1: Select Target Application
• Search for the API application you need access to
• Use the autocomplete to filter by application name or ID
• Select the application from the dropdown
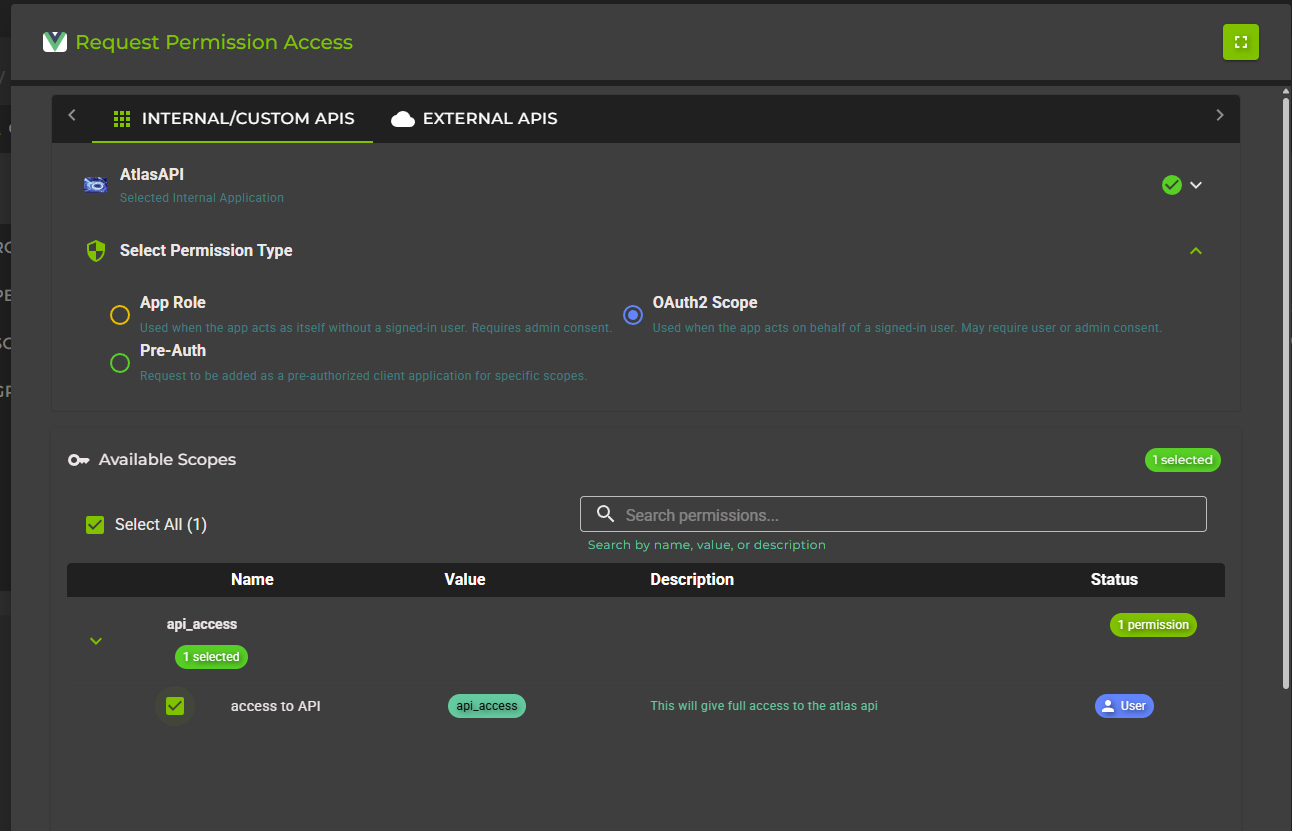
Step 2: Choose Permission Type
• Application Permission: For background services and daemon apps
• Delegated Permission: For user-interactive applications
• Authorized Client: To be pre-authorized for specific scopes
Step 3: Select Specific Permissions
The system displays available permissions based on your selection:
• Browse the list of available permissions
• Use "Select All" to request multiple permissions at once
• Already-granted permissions are shown as disabled with status indicator
• Select only the permissions you actually need (principle of least privilege)
Step 4: Provide Justification
• Explain why you need these permissions (required field)
• Be specific about the use case and business requirement
• Good justification helps approvers make informed decisions
• Maximum 500 characters
Step 5: Review and Submit
• Review the request summary showing all selected permissions
• Verify the target application is correct
• Click Submit Request to send for approval
• Requests are created immediately and owners are notified

Managing Outgoing Requests
The Outgoing tab shows all permission requests your application has made to other applications:
Viewing Outgoing Requests
1. Navigate to the Requests tab
2. Ensure Outgoing sub-tab is selected
3. View all requests grouped by target application
4. Filter by status (Pending, Approved, Denied)

Request Information Displayed
Target Application: Which API you're requesting access to
Permission Details: Name and value of requested permission
Grant Type: Application, Delegated, or Authorized Client
Request Date: When you submitted the request
Status: Pending, Approved, or Denied
Justification: Your explanation for needing the permission
Status Meanings
Pending
Waiting for target application owner to review and approve/denyApproved
Owner approved the request - you may still need to grant consent in Entra IDDenied
Owner denied the request - review denial reason and possibly resubmit with better justificationManaging Incoming Requests
If you're an application owner, you'll receive permission requests from other applications that want to access your API or be pre-authorized:
Viewing Incoming Requests
1. Navigate to your application's Requests tab
2. Select the Incoming sub-tab
3. View requests from other applications
4. Pending requests are highlighted for your attention

Request Details
Each incoming request shows:
• Source Application: Which app is requesting access
• Requester: Who submitted the request (name and email)
• Permission Requested: Specific permission name and description
• Grant Type: Application, Delegated, or Pre-Authorization
• Justification: Why they need this access
• Request Date: When it was submitted
Reviewing and Approving Requests
To process a pending request:
1. Click on the request to expand details
2. Review the justification and assess if access is appropriate
3. Consider the principle of least privilege - is this the minimum permission needed?
4. Click Approve to grant the request
5. For pre-authorization requests, approval automatically configures Entra ID
6. For application/delegated permissions, requester still needs to grant consent in Entra ID

Denying Requests
If you need to deny a request:
1. Click Deny on the request
2. Provide a reason for denial (helpful for the requester)
3. Consider suggesting an alternative permission if appropriate
4. Requester is notified of the denial and your reason
Notifications
The permission request system sends automated email notifications to keep all parties informed:
When Notifications are Sent
Request Submitted
Target application owners receive notification of new permission requestRequest Approved
Requester receives confirmation with next steps (if consent required)Request Denied
Requester receives notification with denial reasonNotification Content
Email notifications include:
• Application names (source and target)
• Requested permission details
• Justification provided
• Direct link to review or view request in AZExecute
• Next steps (for approvals)
After Approval: Granting Consent
For Application and Delegated permission requests, approval in AZExecute is only the first step. Admin consent must still be granted in Entra ID:
For Application Permissions
1. After approval, add the permission to your application in Azure Portal
2. Navigate to App registrations > Your App > API permissions
3. Add the permission and click "Grant admin consent"
4. Permission is immediately active
For Delegated Permissions
1. Add the permission to your application in Azure Portal
2. If admin consent is required for the permission, grant it in Azure Portal
3. If user consent is allowed, users will be prompted during sign-in
For Pre-Authorized Clients
• No additional steps needed
• AZExecute automatically configures pre-authorization in Entra ID
• Client application can immediately access the scopes without consent prompts
Best Practices
For Requesters
Request only what you need
Follow principle of least privilege - don't request broad permissions when narrow ones will workProvide detailed justification
Explain specific use case, not just "needed for application to work"Choose correct permission type
Use delegated permissions when users are involved, application permissions only for background servicesContact API owners if denied
Discuss concerns and possibly request alternative permissionsFor Approvers
Review requests promptly
Pending requests block development work - try to respond within 24-48 hoursVerify justification makes sense
If unclear, ask requester for more details before approvingBe cautious with application permissions
These grant broad access without user context - ensure they're truly necessaryOnly pre-authorize trusted applications
Pre-authorization bypasses consent - use only for first-party apps you controlProvide helpful denial reasons
Explain why denied and suggest alternatives if applicablePeriodically review granted permissions
Use the Grant Report to audit who has access and revoke if no longer needed